In a nutshell, here’s how IssueBurner works. You can create tasks or issues by emailing issues@issueburner.com. When you do, IssueBurner automatically creates an issue associated with your email address and any email addresses listed as recipients in the To: or CC: field. You can start creating issues without signing up, but when you do create an account, you can view your open issues and comment on issues. There are some key benefits to this system, which I think are really going to work out for collaborative teams and customer support desks:
It’s all email based. Issues can be created and tracked all via a simple CC:.You don’t need an IssueBurner account to participate. That means ALL of your customers and clients can get on board, without walking them through the sign up process (which is dead simple anyway).It’s mobile friendly. If you can send an email, you can burn an issue.It helps separate follow-up items from normal emails.It works with ANY email platform. Outlook, Gmail and other email clients let you convert emails to tasks, but IssueBurner lets you share issues among all email platforms.
To get the most mileage out of IssueBurner, you’ll have to apply a little bit of creativity. But one obvious application that comes to my mind is creating a help desk. With IssueBurner, you can turn incoming emails into “tickets” and track the status and correspondence with the customer. I’m going to kill two birds with one stone by showing you how IssueBurner works while setting up a groovyPost “hotline” help desk. On the customer side (or in our case, readers, since we don’t have customers), it’ll be as simple as emailing the help desk, which I’ve set up at jack+help@groovypost.com. But on the respondent side, there’s a bit of set up involved.
Step One
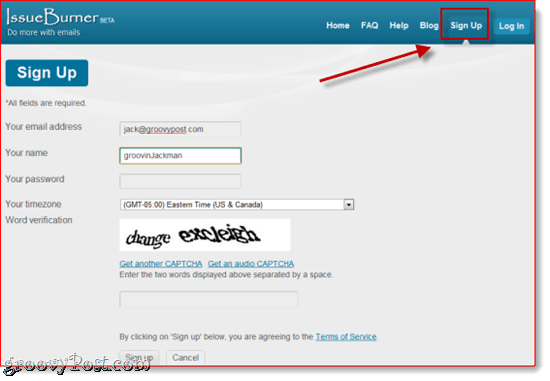
Sign up for IssueBurner. All you have to do is visit IssueBurner.com and click Sign Up. Give them your name and email address and you’re done.
Note that you don’t necessarily have to use the email address that you’ll be using to field incoming help desk requests.
Step Two
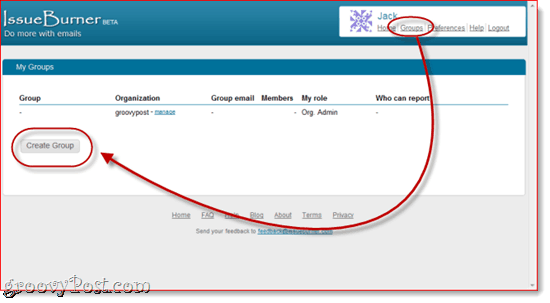
Create a group in IssueBurner. You could actually skip this step if you plan on dedicating this account to a single purpose, but if you want to use IssueBurner for other organizations and duties, a group is a good idea. Click Groups in the top-right and click Create Group.
Enter in a group name and organization. Here, I’ve chosen “Help” and “groovyPost.”
Note that this address won’t be visible to the public. Instead, they’ll email the address I mentioned above, which will be the sole address which can handle issues. This adds a layer of spam protection, but also gives a more professional look by including your own domain name in the email. Now, notice I’ve set it up so issues can be reported by Anyone. This is necessary for the time being, so we can verify the Gmail forwarding rule. You might want to come back and change it to Group members only later. Click Create when you’re done. Next, add the members who can add issues. For our purposes, I’m going to add jack+help@groovypost.com. You can add others, if you want. Say, I could also add jerry+help@groovypost.com or tammy+help@groovypost.com, if I wanted others to be able to field help requests as well (and if those people actually existed). Remember: with Google Apps for Domains and Gmail accounts, anything you add after a + sign is ignored, but can still be used for filtering purposes. Read our previous post for more information on Customized Gmail Addresses.
One last thing you should do is change the reply-to address. To do so, click Groups and click Manage next to the group name. Under Group Settings, click Change next to “Default from and reply-to email”. Doing so will keep your IssueBurner.com email address private.
Okay, now we’re all set up on IssueBurner. Let’s go to Gmail.
Step Three
Set up forwarding in Gmail. The goal here is to forward all emails sent to jack+help@groovypost.com to help.groovypost@issueburner.com. In order to do that, we have to first verify that we are authorized to forward to the latter address. In Gmail, click Settings and choose Forwarding and POP/IMAP. Click Add a forwarding address and enter help.groovypost@issueburner.com, or whatever you set up your group IssueBurner account as.
After doing so, Gmail will send an email to the IssueBurner account with a confirmation link. IssueBurner will bounce this back to you as a new issue, so it should show up in your Gmail inbox. You can also see it in your IssueBurner account. Click it to confirm.
Step Four
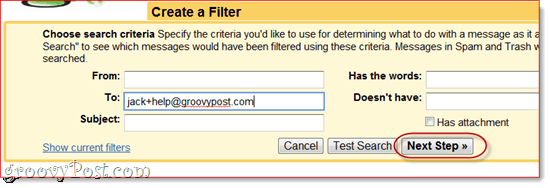
Filter messages sent to your customized Gmail address. Click Settings and choose Filters and click Create a new filter. In the To: field, enter your custom email address and click Next Step.
You can set up these rules how you wish, but since IssueBurner will be notifying you of new issues anyway, I like to select Mark as Read and Skip the Inbox. The most important option to choose is to select Forward it to: and choose help.groovypost@issueburner.com. Click Create Filter when you’re done.
Now, you’re done. Let’s try it out.
Creating Tasks with IssueBurner
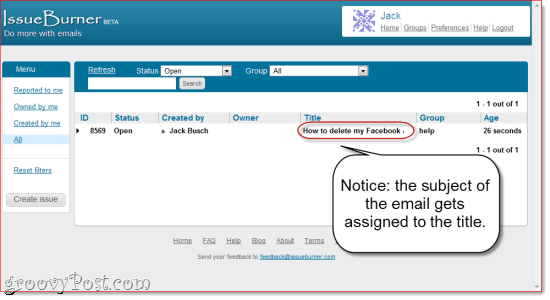
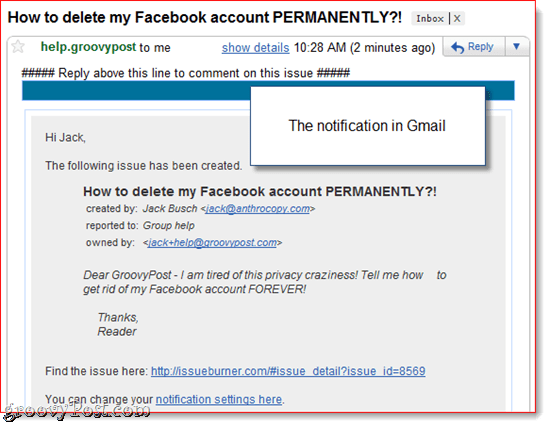
Now, with the Gmail filter we’ve set up and the IssueBurner group we have, any emails sent to jack+help@groovypost.com will automatically be turned into an IssueBurner issue. The name of the issue will be the subject of the email, and the description will be the body of the email. For example, let’s say someone emailed me a question about How-to Permanently Delete Your Facebook Account.
Once the above email is sent, two things happen:
Note, it may take a few minutes for the issue to show up. And here it is in Gmail…
Responding to Tasks
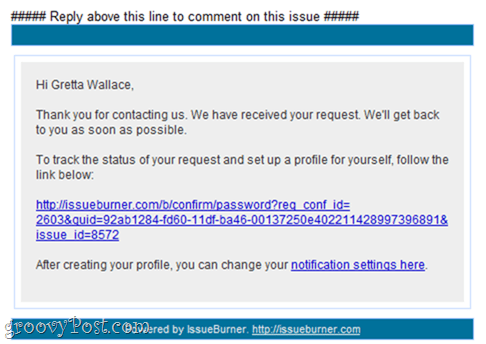
If the user doesn’t have an IssueBurner account, they’ll receive a canned response notifying them that the issue has been received. They’ll also be invited to sign up.
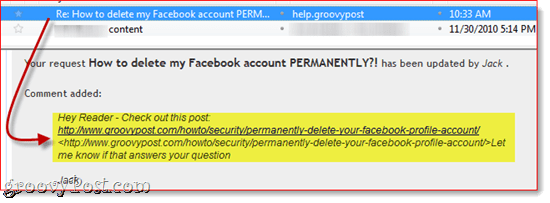
So, let’s say in response to this reader, I want to direct them to our post on deleting your Facebook account. I could reply to the email I received from IssueBurner to add a Comment. Regardless if the reader signed up, they will receive a notification that the issue has been updated with a comment.
If they do sign up, they can track all comments and status of their issue from their own IssueBurner account.
The reader or customer can respond to the email with their comment, letting you know if your solution fixed it or not. This gets added on to the task as a comment, which you can view from your own IssueBurner dashboard.
Managing and Closing Issues
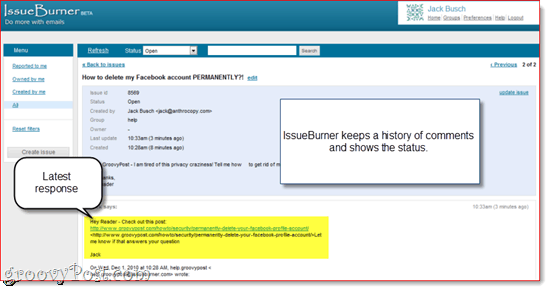
You can sort issues by group or status at IssueBurner.com.
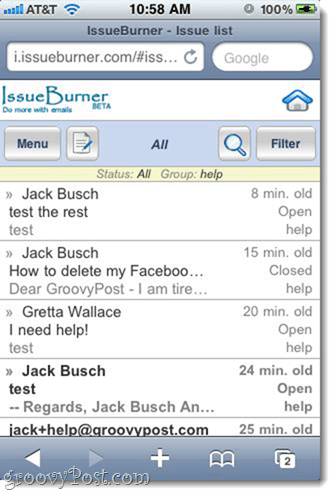
IssueBurner.com also has a very nice mobile site.
Once an issue is resolved, you can simply close it from the IssueBurner dashboard. All associated users will be notified as such. Alternately, you can flag it as “Later” which may be useful if a solution is pending and you’d like to follow up when it’s available.
Also, you may noticed here that I’ve added an Internal comment. These will only be viewable by the group members and admins. So, for example, if you want to call the customer a dope or tell everyone to ignore his requests, you can do so with an Internal comment and they’ll be none the wiser.
Conclusion
As I mentioned, this is only one application for IssueBurner. You can use it to collaborate with groups, or to keep track of tasks for yourself. For example, if you want to remind yourself to follow up with a contact if they don’t reply, but don’t necessarily want them to see your IssueBurner issues, you can BCC issues@issueburner.com. Or you can use it to keep track of invoices and bills by CC’ing issues@issueburner.com whenever you email your accounting department. If you’re clever and organized, IssueBurner can be a boon to your productivity. Note that IssueBurner is currently free, and will remain free while it’s in Beta. Webyog, the company who made IssueBurner and CloudMagic, promises that they’ll give you 60 days notice before introducing any pricing structures. They don’t know what it may look like in the future, but it’ll likely have a free and paid version. P.S. I really did create this system, so if you have an burning questions, email me at jack+help@groovypost.com or check out our forum. Nice post. Thanks for spreading the word. Feel free to contact us at feedback@issueburner.com if you have any feedback or need some help. Cheers, Chirag Team IssueBurner Comment Name * Email *
Δ Save my name and email and send me emails as new comments are made to this post.


![]()
